

Figure 1: I also think that if the task is not time-consuming at all
I wouldn't be able to call myself a DevOps Engineer1 if I wouldn't automate even the silliest and most banal of tasks. Not even when I know that I will spend considerably more time writing the code (and debugging it!) than it will ever save me. In this post, we will have a look at how to automate publishing your Rust crate.
Publishing your crate is one of the most complex deployments out there. On par with publishing your app in the Apple App Store or updating your Kubernetes deployment across availability zones, I'd say. It requires you to run this command:
> cargo publish
I know, I know. It's all very scary looking. Hard not to screw up. It requires you to type a whopping two words containing a grand total of twelve characters. Twelve characters! Who in the world has the mental capacity to remember such a lengthy and completely convoluted command?
All jokes and irony aside, I am a firm believer that every software project should have a sound CI/CD setup and I think that this setup should contain the seemingly trivial tasks, even when the automation looks a lot more complex than the task itself. A late adopter of the CD (continuous deployment) part of CI/CD, I learned that there is more to a release than meets the eye, even with seemingly simple deployments like a crate distributed via Cargo. Creating a release always requires you to execute more than just a single command. There are simple things that need to be done, like tagging the release commit. But publishing a crate can also be embedded in a bigger and more complex release setup that consists of multiple deployments to different registries and other places like package managers or app stores.
The moment you have to execute more than a single instruction to complete a task, you enter the land of automation. I've messed up releases before. So far just annoying little things like forgetting to create the Git tag or creating a tag that has the wrong version. But as a notorious over-thinker and perfectionist, the thought of leaving a project in such a subtly inconsistent state makes me shiver. Luckily there are other neurotic people out there that came up with the idea of CI/CD and convenient and powerful tools like GitHub Actions.
This post contains a step-by-step tutorial on how to set up a GitHub Actions workflow that publishes your crate to crates.io when you push a tag that looks like a SemVer version (without extensions). This tutorial expects you to have a basic knowledge of GitHub Actions, a GitHub repository with a crate you wish to publish and an account on crates.io. Except the first part (where we get an API token from crates.io), this tutorial extends to publishing a crate to registries other than crates.io as well. The complete workflow can be found in this section.
# 1. Get an API Token from crates.io
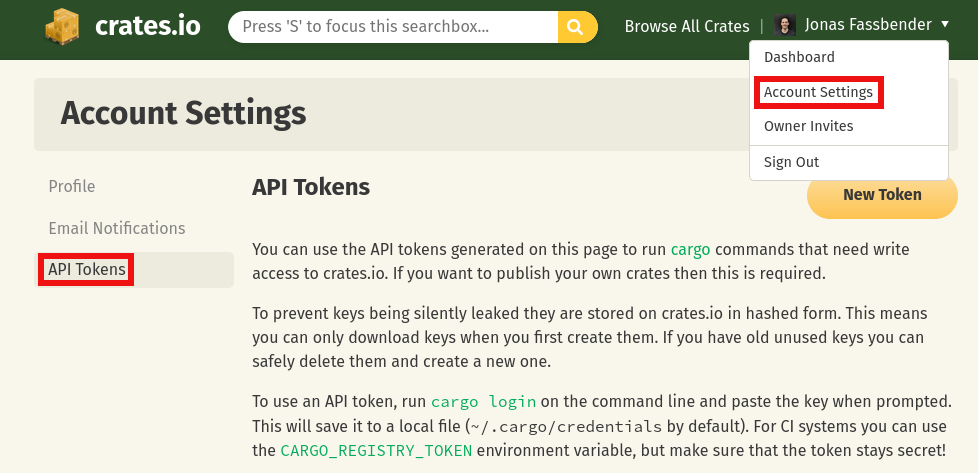
Figure 2: How to navigate to
https://crates.io/settings/tokens
from within the webapp
First, we need to authenticate ourselves with crates.io.
The registry needs to know who we are and if we in fact have the right to
publish our crate.
For this, crates.io offers API tokens.
You can generate a new API token in the web UI.
To do that, make sure you are signed into crates.io in your browser (I registered with
crates.io with my GitHub account which makes SSO nice and easy).
Once you are signed in, navigate to https://crates.io/settings/tokens.
In the web UI you have a drop-down menu in the upper right corner, next to your
avatar and username.
It contains an entry "Account Settings".
The account settings contain the page "API Tokens" where we can manage our
tokens.
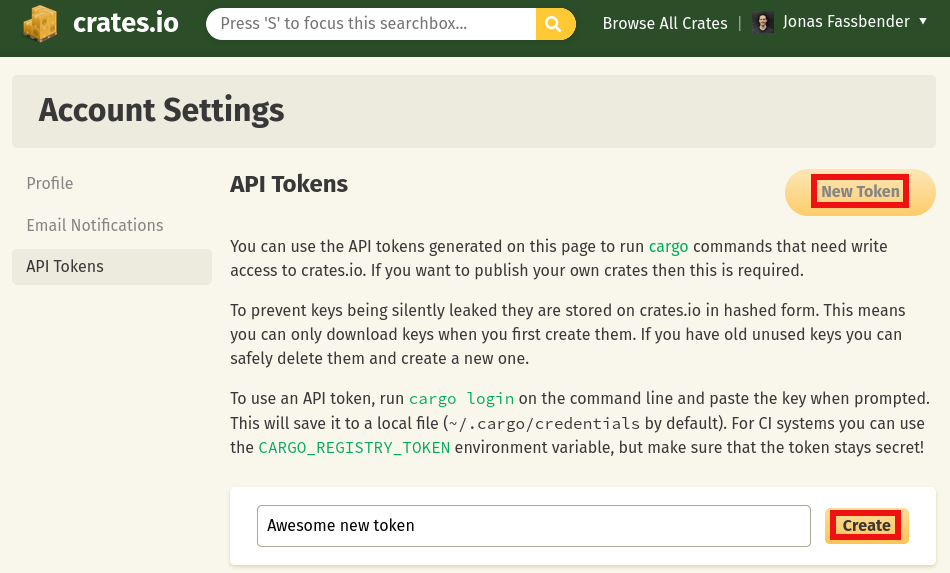
Figure 3: Create a new API token
There's a button on the API tokens page that says "New Token". Click on it. A new text field will open below. Type in the name you want to associate with the new token. I normally use the crate name, that way I know where I used the token. This'd make deleting the token after it accidentally got leaked easier. Once you've typed the token's name, click on the "Create" button next to the text input. The token will be displayed below. Copy the token and don't close the page until you have successfully stored the token safely (you'll never be able to see the token again after closing the page!).
# 2. Store the API Token in a GitHub Secret
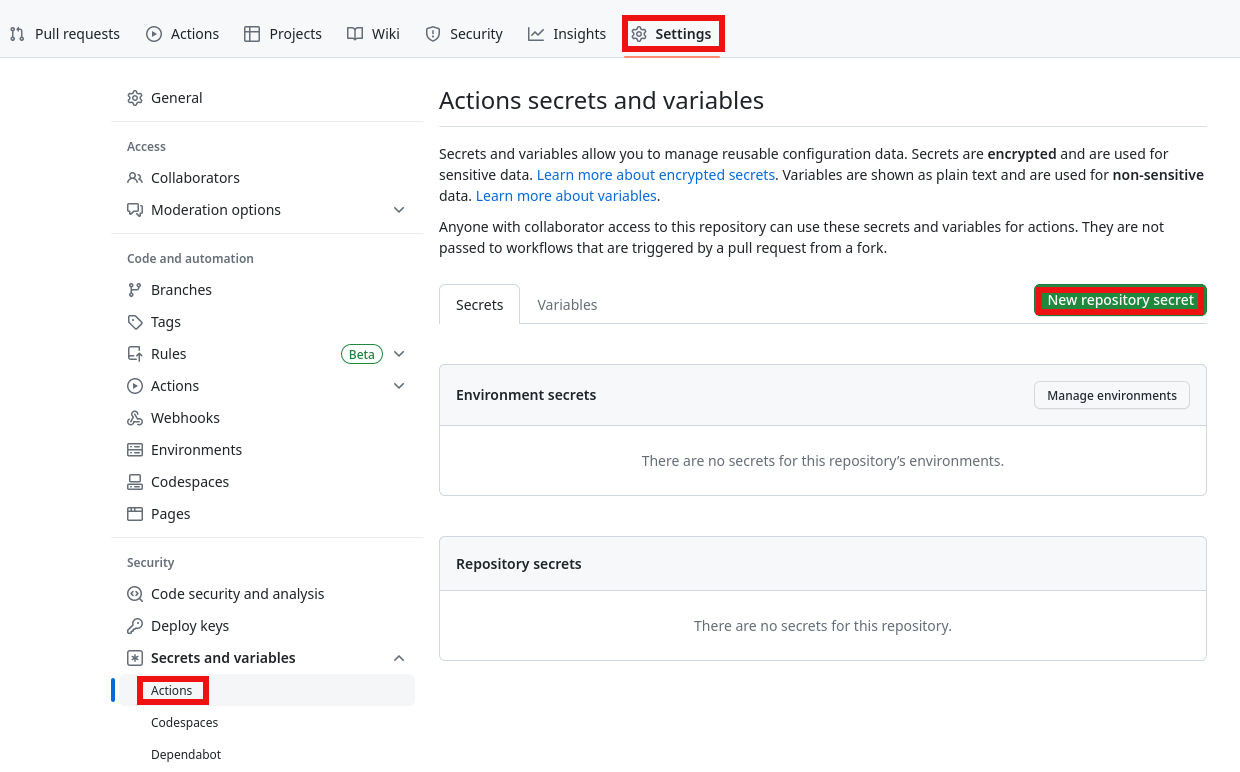
Figure 4: How to navigate to https://github.com/{user or orga}/{repo}/settings/secrets/actions/new
from within the webapp
Once we have copied our API token from crates.io to our clipboard, we have to
make it available to our workflow.
The token must stay a secret (otherwise people could publish malicious content
to crates.io using our credentials or yank
our crates).
We can store the token securely on GitHub in an Action secret.
You can create a new secret for the repository containing your crate under
https://github.com/{user or orga}/{repo}/settings/secrets/actions/new.
You can navigate to the page from your repository.
You can find it under Settings > Secrets and variables > Actions (see
Figure 4).
The page you'll see is depicted in Figure 5.
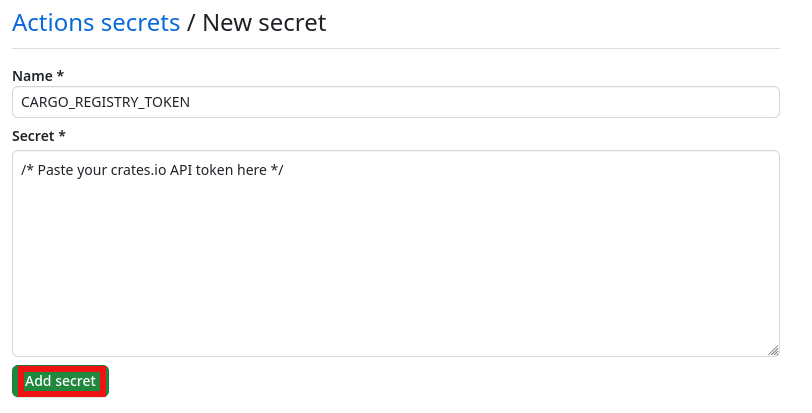
You have two text inputs, one for the name of the secret, one for the secret
itself.
Type in the name of your secret.
I use CARGO_REGISTRY_TOKEN for the secret name, as it is the name of the
environment variable
Cargo uses to look up the token during publishing.
We'll use the secret name explicitly in our workflow, mapping it to the
environment variable, so you can name the secret however you like.
Paste the secret from the clipboard into the second text input labeled
"Secret".
Click on the "Add secret" button below to create the secret.
# Using the GitHub CLI to Create the Secret
Instead of using GitHub's web UI, you can also use GitHub CLI, which you may find more convenient. Open your console and navigate to your repository. Inside your repository, run the following command to create the secret:
gh secret set CARGO_REGISTRY_TOKEN -b "$TOKEN"
$TOKEN is your API token from crates.io.
On Linux with X11, you can insert the token from your clipboard easily with:
gh secret set CARGO_REGISTRY_TOKEN -b "$(xclip -o)"
You can find the documentation for the gh secret set command
here.
# 3. Write the Workflow
Now that we have our API token in place, we can finally get to the fun part:
writing the actual workflow.
Workflows are yaml files that live in the .github/workflows directory of your
repository.
Let's create a new workflow .github/workflows/publish.yml and start with
giving it a name:
name: Publish
Okay now, that was not very spicy.
Let's get to a more fun section of our workflow we have to define, the trigger.
We want to trigger the publishing workflow when we create a tag that looks like
the version of our crate.
The version of our crate can be found in the Cargo.toml manifest file in the
package.version
field.
Crates must adhere to semantic versioning, as it is used by Cargo to check for
compatible versions during dependency resolution.
Without going into much detail, SemVer version numbers consist of three numeric
parts (called major, minor and patch) separated by dots, like 1.0.1, or
0.1.1234, for example.
Semantic versioning also supports additional labels and metadata—so called
extensions—after the version number, like 1.0.0-beta.122.
Tag filters can be described with a
glob pattern
that looks a little bit like a regular expression.
Let's have a look at the trigger already:
on:
  push:
    tags:
      - v[0-9]+.[0-9]+.[0-9]+
The on
field looks pretty straight-forward.
Every time we push a tag that looks like v[0-9]+.[0-9]+.[0-9]+, run this
workflow.
For example, when we push a tag v0.1.0, this workflow would be executed,
whereas a tag some-tag would not trigger this workflow, as it is not matched
by the glob pattern.
Note that if you prefer your version tags without the leading v, all you have
to do is remove the v from the glob pattern: [0-9]+.[0-9]+.[0-9]+.
This would match a tag consisting solely of a SemVer version number, like
1.2.3.
Now that we have our trigger, we have to tell GitHub what to do. There are basically only two steps necessary to publish our crate, (I) make the source code available in our workflow runner and (II) tell Cargo to publish it. But first GitHub needs to know what kind of machine and container we'd like our workflow to run in. We'll use a fairly common setup—in Rust world—for that, namely the latest Ubuntu LTS version as basis and on top of that the latest release of the Rust container that makes the necessary tools to publish our crate available to us:
jobs:
  Publish:
    runs-on: ubuntu-latest
    container:
      image: rust:latest
Now that we have our basic runner setup, we have to write the necessary steps our runner should perform. To get the source code from our repository, we'll use the checkout action. It will pull our repository into the workflow, allowing it access to the contents, i.e. the crate's source code:
 jobs:
   Publish:
     runs-on: ubuntu-latest
     container:
       image: rust:latest
+    steps:
+      - name: Checkout repository
+        uses: actions/checkout@v3
Everything is in place now for Cargo to do its job and publish our crate.
All we have to do is run cargo publish with our API token exposed in the
CARGO_REGISTRY_TOKEN environment variable and Cargo will do the rest:
 jobs:
   Publish:
     runs-on: ubuntu-latest
     container:
       image: rust:latest
     steps:
       - name: Checkout repository
         uses: actions/checkout@v3
+      - name: Publish
+        run: cargo publish
+        env:
+          CARGO_REGISTRY_TOKEN: ${{ secrets.CARGO_REGISTRY_TOKEN }}
Et voilà! Not hard to setup a GitHub Action workflow that publishes your crate
to crates.io at all!
Note that if you used a different name than CARGO_REGISTRY_TOKEN for the
secret with the API token from crates.io, you have to change
${{ secrets.CARGO_REGISTRY_TOKEN }} to ${{ secrets.YOUR_SECRET_NAME }}.
Here our whole workflow at this point:
name: Publish
on:
  push:
    tags:
      - v[0-9]+.[0-9]+.[0-9]+
jobs:
  Publish:
    runs-on: ubuntu-latest
    container:
      image: rust:latest
    steps:
      - name: Checkout repository
        uses: actions/checkout@v3
      - name: Publish
        run: cargo publish
        env:
          CARGO_REGISTRY_TOKEN: ${{ secrets.CARGO_REGISTRY_TOKEN }}
# Publishing to Registries other than Crates.io
So far we only looked at publishing to crates.io, the default registry used by
Cargo.
What if you want to publish to a different registry?
Let's have a look how we can set up our workflow to publish to another
registry.
Note that in this tutorial we want to configure Cargo solely from within the
workflow, not with a configuration file.
Let's use the example from the Cargo Book.
Say you want to publish to the my-registry registry, whose index is located
at https://my-intranet:8080/git/index.
To tell Cargo to use a different registry than the default registry, we can
use the --registry flag:
cargo publish --registry=my-registry
We still have to provide an API token to the new registry.
This must be done with a different environment variable than
CARGO_REGISTRY_TOKEN, which we used before, as it only works for crates.io.
For a different registry, Cargo uses the CARGO_REGISTRIES_<name>_TOKEN
environment variable, where <name> is the stylised name of our registry
(stylised to uppercase and dashes are converted to underscores).
In the my-registry case, the environment variable would be
CARGO_REGISTRIES_MY_REGISTRY_TOKEN.
Unfortunately, we are not done yet.
Cargo knows where it can find the index of crates.io, but we have to tell it
where it finds the index of my-registry.
So we need to add another environment variable with the index.
It looks nearly identical with the environment variable with the API token:
CARGO_REGISTRIES_<name>_INDEX. Here the changes to the workflow to publish to
my-registry, instead of crates.io:
 name: Publish
 on:
   push:
     tags:
       - v[0-9]+.[0-9]+.[0-9]+
 jobs:
   Publish:
     runs-on: ubuntu-latest
     container:
       image: rust:latest
     steps:
       - name: Checkout repository
         uses: actions/checkout@v3
       - name: Publish
-        run: cargo publish
+        run: cargo publish --registry=my-registry
         env:
-          CARGO_REGISTRY_TOKEN: ${{ secrets.CARGO_REGISTRY_TOKEN }}
+          CARGO_REGISTRIES_MY_REGISTRY_TOKEN: ${{ secrets.CARGO_REGISTRY_TOKEN }}
+          CARGO_REGISTRIES_MY_REGISTRY_INDEX: https://my-intranet:8080/git/index
# 4. Optional: Comparing Cargo.toml Version with Tag
While we automated crate publishing just now, there's an easy-to-make error we
haven't protected us from yet.
Namely using a tag that does not match the version number of our crate.
As stated above, Cargo uses the package.version field from the Cargo.toml
manifest file of your crate to determine the version that is published.
Say we want to publish version 0.2.1 of our crate.
So far, nothing hinders us from triggering the workflow with a tag that looks
like a SemVer version different from the one in our manifest.
For the paranoids, this is not good enough.
Having release 0.2.1 tagged as 0.2.2 is not acceptable.
So we need to compare the version in our manifest with the tag and make sure
they are equal.
Getting the name of the tag we pushed is easy.
It is available to our workflow in the github.ref_name property of the
github context.
Getting the value of the package.version field from Cargo.toml is more
tricky.
We need a tool that can parse toml files and extract the information we need
from it.
Luckily there is such a tool available that is easy to get with the tools we
already have installed in our runner: toml-cli.
toml-cli is a CLI program distributed as a Rust binary on crates.io.
Binaries from crates.io can be installed with
cargo install:
cargo install toml-cli
After we have installed toml-cli, we can extract the version from our
manifest file with the following command:
toml get -r Cargo.toml package.version
All that is left is compare the extracted version from our manifest with the
pushed tag.
We'll use another command that we already have available in our runner:
Bash's test command.
It allows us to compare two strings—the version from our manifest and our
tag—and fail the workflow if they are not equal (by returning an exit
code other than zero).
Here's how we install toml-cli and compare manifest version with the tag, in
two easy steps:
 name: Publish
 on:
   push:
     tags:
       - v[0-9]+.[0-9]+.[0-9]+
 jobs:
   Publish:
     runs-on: ubuntu-latest
     container:
       image: rust:latest
     steps:
       - name: Checkout repository
         uses: actions/checkout@v3
+      - name: Install toml-cli
+        run: cargo install toml-cli
+      - name: Check version
+        run: test "v$(toml get -r Cargo.toml package.version)" = "${{ github.ref_name }}"
       - name: Publish
         run: cargo publish
         env:
           CARGO_REGISTRY_TOKEN: ${{ secrets.CARGO_REGISTRY_TOKEN }}
If you don't use the v in front of your version number in your release tags,
you have to remove the v in front of the embedded call to toml-cli in the
"Check version" step.
If your Cargo.toml manifest file is not located in the root directory of your
repository, you'd have to change the path to in the call to toml-cli:
toml get -r path/to/Cargo.toml package.version
# 6. Final Workflow
In this tutorial we looked at how to automate publishing a Rust crate with a
GitHub Actions workflow.
We created a trigger that runs the workflow whenever we push a tag that looks
like a SemVer version number (with a leading v and without) and performs the
necessary steps to publish our crate (to crates.io or another registry).
Furthermore we made the workflow more bullet-proof by adding a test that makes
sure the crate version in our Cargo.toml manifest file matches the tag we
pushed, to avoid having releases labeled with the wrong version number.
Here the final workflow:
name: Publish
on:
  push:
    tags:
      - v[0-9]+.[0-9]+.[0-9]+
jobs:
  Publish:
    runs-on: ubuntu-latest
    container:
      image: rust:latest
    steps:
      - name: Checkout repository
        uses: actions/checkout@v3
      - name: Install toml-cli
        run: cargo install toml-cli
      - name: Check version
        run: test "v$(toml get -r Cargo.toml package.version)" = "${{ github.ref_name }}"
      - name: Publish
        run: cargo publish
        env:
          CARGO_REGISTRY_TOKEN: ${{ secrets.CARGO_REGISTRY_TOKEN }}
I don't call me that, but I enjoy dabbling with modern concepts of DevOps like CI/CD, artifact registries, containerisation, Kubernetes and cloud computing. I also love writing my own CLI programs and scripts to make Ops as easy and convenient for me as possible.
This tutorial omits the support for extensions, focusing solely on the version number. You can find regular expressions for matching SemVer versions correctly here, in case you have the need to extend the workflow trigger to contain such. GitHub's glob patterns are not very powerful compared to regular expressions. Therefore it's quite hard (if not impossible) to write a universal filter that'd match all possible SemVer versions, while not matching a string that is not a valid SemVer version. I leave it up to you to write a glob pattern that fits your use of SemVer extensions.